Medela PISA Assembly: A Step-by-Step Guide
Whether you are looking at purchasing a breast pump, or already have yours, this guide to Medela PISA assembly will walk you through step by step.
Assembling the Medela PISA is a pisa cake (sorry… pun intended). Wash, sterilize, and dry the parts, then put everything toggether. The washing will probably take longer than the assembly!

Some of the links below are affiliate links. This means that, at zero cost to you, I will earn an affiliate commission if you click through the link and finalize a purchase.
Step 1: Take inventory
First of all, the Medela PISA comes with several parts and you will need to wash most of them.

The Medela Freestyle breast pump comes with a tote bag, portable battery pack, electrical plug, small cooler bag, small ice pack, four 5 oz (150 ml) bottles, one set of two 24mm flanges, two connector tubes, and two valves with membranes.
You will need to wash the bottles, flanges (the “shields” that go onto your breasts), and valves (the little, hard plastic yellow pieces and white flaps).
Medela recommends:
Before using for the first time, clean and sanitize kit parts: breast shields, breast shield connectors, white membranes, yellow valves, breast milk bottles and lids.
Sanitize breast pump kit parts once daily. To sanitize:
1. Fill a pot with enough water to cover all parts.
2. Bring water to a boil.
3. Place parts in boiling water for 10 minutes.
4. Allow water to cool and gently remove parts from water with tongs.
5. Place parts on a clean surface and/or towel.
Allow parts to air dry
Store parts when not in use.
Do NOT store wet or damp parts.
Or you may sanitize your kit parts by following the instructions on Medela’s Quick Clean Micro-Steam bag (click to view Amazon)
You just put all the parts in the bag with some water and pop it in the microwave.

Note that you do not need to wash the tubing, as it does not come in contact with milk.
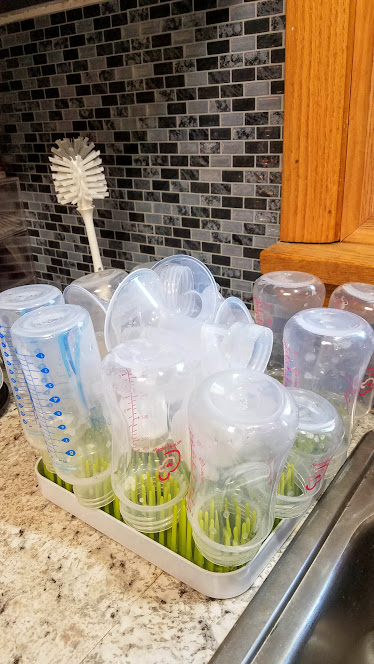
No matter how you wash your parts, you will need to dry them. I use this cute drying rack that looks like fake grass (click to view on Amazon).
Once everything is clean and dry, we can assemble the PISA! Medela also offers the instructions online here.
Related post: My favorite tips for making pumping sessions with the PISA more comfortable and productive.
How to Assemble the Medela PISA
First, snap the white membranes onto the yellow valves. The membranes should lay flat on the valves.

Second, connect the valves to the bottom of the breast shield connector. Next, screw the breast shield connectors onto the bottles.

Now, take the end of the tubing with the yellow adapter into the breast shield connector. Some models have you insert the adapter into the top and others insert into the side. (I took the bottle off for easier picture-taking).

Finally, plug the other end of the tubing into the breast pump. If you are single pumping, only plug in one tube and cover the other opening with the cap. If you are double pumping, plug in both tubes and put the cap onto the holder. Finally, plug the power adapter into the front of the pump and into a power outlet. You are now ready to pump!
Related post: Compare the Medela PISA to the Spectra S2 – from a mom who’s used both!

I love that the PISA’s parts all easily fit back inside the bag for storage! Makes keeping all the little pieces together very simple!
Related post: 15 things to do while breastfeeding or pumping
Conclusions: Medela PISA Assembly
Overall, Medela PISA assembly is very simple! Clean the parts, put the backflow protectors together, put them onto the breast shields, put them onto the bottles, and then hook the bottles up to the tubing.
Happy pumping, mamas!
Related post: Tips On What To Do With An Old Breast Pump